Sunday, May 9, 2021

Dynamic Arp Inspection , DAI

It strikes me that not many organizations enable Dynamic Arp inspection or DAI for short, on their switches users connect to. Why bother with DAI anyway you might ask. I would say this is something that it easy to activate to make switch block ARP messages that are not legit on your network. Those ARP messages can be utilized by an attacker to trick devices on a segment that the attacker computer is the router which will make traffic from client computers go to the attackers computers instead of the router.

First we need to think about how ARP work. When a host want to communicate with another host and it does not know the MAC address of the target host it send out an ARP messages asking who has this IP address, the target host should then do an ARP reply saying I have the IP address and MAC address you asked for. Next the communication can be established on Layer two between the learned mac addresses.
In comes the bad host answering the ARP reply (even though it should not) or sending a Gratuitous ARP (sort of an ARP reply without anyone asking for it). ARP reply can then contain the asked for IP address but with the MAC address of the bad host tricking the other host to send traffic to the bad host instead of the intended host. 
This can be stopped by enabling DAI on the switch which is quite easy.
ip arp inspection vlan x , where x is the vlan you enable DAI on
ip arp inspection vlan 101

To see info about DAI you use "show ip arp inspection"

Source Mac Validation      : Disabled
Destination Mac Validation : Disabled
IP Address Validation      : Disabled

 Vlan     Configuration    Operation   ACL Match          Static ACL
 ----     -------------    ---------   ---------          ----------
  101     Enabled          Active

 Vlan     ACL Logging      DHCP Logging      Probe Logging
 ----     -----------      ------------      -------------
  101     Deny             Deny              Off


But how does the switch know what mac address and IP addresses are legit? 
It uses the DHCP binding database. So to be able to use DAI you must first enable DHCP snooping to make switch to build the dhcp binding database (see my previous posts about DHCP ). This will introduce a problem for hosts with a static IP address not received from a DHCP server, the IP and MAC address binding is not in the snooping database on switch and will therefore be blocking the ARP replies making other hosts not be able to communicate with the host with static IP address since no one will learn its MAC address.

You will see this in the switch log.
*May  9 12:53:55.779: %SW_DAI-4-DHCP_SNOOPING_DENY: 1 Invalid ARPs (Res) on Et0/0, vlan 101.([0000.0c9f.f065/10.1.101.1/5000.0012.0000/10.1.101.11/14:53:54 EET Sun May 9 2021])

Log entry means that port E0/0 , vlan 101 has blocked an arp packet from 10.1.101.1 with MAC 0000.0c9f.f065 going to 10.1.101.11  with MAC 0000.0c9f.f065

There is two solutions to this. You can either set the interface as trusted.
SW3(config-if)#ip arp inspection trust
similar to the DHCP trusted ports function.
You probably do this with the uplink interface leading to other switches and routers. But remember that it is basically the same as disabling ARP inspection on that interface.
Or you can create a static binding with mac address, IP address, vlan and interface.
This is accomplished by creating an ARP access list and then apply it to the vlan.

arp access-list VLAN101
permit ip host 10.1.101.1 mac host 0000.0c9f.f065
Add as many IP address to MAC address mapping you need in this ACL and then apply the ARP ACL to the vlan
ip arp inspection filter VLAN101 vlan 101
You have now allowed a host to make ARP reply with IP address 10.1.101.1 to use MAC address of 0000.0c9f.f065 on vlan 101.

You can configure a lot more with DAI, such as rate limit  and logging and what parameters in the ARP package to verify.
With "show ip arp inspection" we saw that there was no inspection of mac-addresses and IP address. I suggest you enable validation of these fields in the ARP package.
ip arp inspection validate src-mac dst-mac ip

To rate limit ARP packages use the interface command "ip arp inspection limit rate x" where x is number of ARP packages per second. Default is 15 which might is too small on a trunk interfaces.

You see, DAI is not that complicated at all and is easy to enable.


Tuesday, January 19, 2021

DHCP take 2

Now we will look at a larger topology with multiple switches, routers, portchannel and SVI interfaces to see how DHCP work.

Clients are connected VLAN101 on switches with Layer 2 functionality only, they are then connected with multiple connections creating a logical Layer2 portchannel interface between itself and the Layer3 switches  (Port-Channel 1 for North-South connection, Port-Channel 2 diagonal connection). They are the first hop and run VRRP/HSRP for redundancy and they are further connected to routers which is the connection further where we have the actual DHCP servers.


Client is connected to Swicth3 and the switchport is configured as an access port in vlan 101. Vlan 101 is also enabled on the trunk to switch1 and 2.
On switch1 and 2 there is a SVI created for vlan 101 and there is also HSRP created on vlan 101 for clients to use as the Default Gateway.
When Client broadcast a DHCP Discover it will just pass through switch3 and land on SVI vlan 101 on switch1 and 2. on Interface vlan 101 we need to configure ip-helper (dhcp relay agent) to convert the broadcast to a direct unicast to the DHCP servers in the network. You can and should have multiple ip-helper addresses configured for redundancy and loadbalancing.

SW1(config)#interface Vlan101
SW1(config-if)#ip helper-address 10.10.10.1

One thing that might trip you off here is that when the DHCP relay agent on Switch1 or 2 convert the broadcast to unicast and send it to DHCP server it will use its own SVI interface address as the source and you must have correct routing between DHCP server and the SVI interface.
No surprise here even though it’s a larger environment than the small we started with in DHCP take 1

Now over to some security concerns regarding to DHCP.
What if someone introduce a new DHCP server (either by mistake or maliciously) on vlan where we have clients? This rouge DHCP server might be handing out IP addresses that don’t work on our network which will cause clients to not be able to reach its resources or even worse handing out correct addresses but with wrong options such as default gateway to another address where the "bad" people sit and listen for traffic from clients picking up all kinds of information that should be kept secret. This could be done without even clients noticing something bad is happening. Traffic will be instead of the wanted between client and directly to the HSRP address shared between Switch1 and 2 going from client to the bad gateway where traffic can be intercepted and send on to the correct gateway (the HSRP address).
There is switch function called "DHCP snooping" to our rescue here. DHCP snooping will actually block DHCP server traffic if the port is categorized as untrusted and only allow full DHCP traffic if the port is "DHCP snooping trusted". DHCP snooping sit and listen for DHCP traffic and over time build up a database of mac-addresses, IP-addresses, vlan, lease time and ports, this information will then be used by the switch to block DHCP traffic which don’t match what the dhcp snooping database say, such as sending a DHCP release from wrong port or mac-address. The Snooping information can also be used by other functions in the switch such as arp-inspection, ip-source guard.

Configure DHCP snooping:
On interfaces leading towards DHCP servers you set the port as trusted to allow DHCP server responses.

SW3(config)#interface port-channel 1
SW3(config-if)#ip dhcp snooping trust

Then you enable DHCP snooping globally on the switch
SW3(config)#ip dhcp snooping

You must then enable DHCP snooping on the vlan's
SW3(config)#ip dhcp snooping vlan 101

You would think this is enough, no no no. when we enable dhcp snooping on switch3 it will not only listen for the dhcp traffic and build the database but also inject DHCP option 82 (Agent Information Option). DHCP relay agent insert information in option 82 to signaling to DHCP server which scope to use, this is done with option 82 field "giaddr", (gateway interface/ip address). Since our switch3 is layer2 only and actually run the relay agent it set the giaddr to null. When traffic comes to DHCP relay agent on switch1 it will be dropped because of giaddr is blank. To see this you must first enable debug for dhcp server.

SW1#debug ip dhcp server packet
and then you will see
---
00:37:45: DHCPD: Reload workspace interface Vlan101 tableid 0.
00:37:45: DHCPD: tableid for 10.1.101.2 on Vlan101 is 0
00:37:45: DHCPD: client's VPN is .
00:37:45: DHCPD: inconsistent relay information.
00:37:45: DHCPD: relay information option exists, but giaddr is zero.
---

With this we need to configure the relay agent on switch1 to accept empty giaddr field, we do this by allow the interface to trust option 82 information.
SW1(config)#interface vlan 101
SW1(config-if)#ip dhcp relay information trusted

Wireshark capture also reveals that option 82 is in the DHCP Discover packet.


Information in option 82 can be used by the DHCP server to further make a choice which DHCP pool to use or parts of pools or options  to send back in the offer to clients. You can get some type of clients a special range of addresses or if clients are connected to a specific switch they will get some option in the offer. What information in option 82 and how its structured will differ between vendors and possibly software versions. I will not go into how to do this nor how to make the DHCP server make decisions on what to offer clients.

There are other option you can use on switch1 to allow the empty giaddr such as set all interface to trusted or trust all untrusted which will allow all DHCP discover packets with empty giaddr regardless of which interface it comes in on, that’s bad idea in my opinion, better to be specific. Don’t forget in case of a network failure where traffic is received on other interfaces to set the other interfaces to trust the empty giaddr.


Wednesday, December 30, 2020

DHCP take 1

You would think DHCP is easy, well it can be but it also can be quite tricky and sometimes it's a security risk you as the network administrator need to take care of.

I will start with a very small network to get the concepts straight and then I will do more complicated network and also add in the security layer.

Let's start with a small network, one switch with everything in same VLAN, a firewall, couple of servers and some clients (picture not showing all connected devices to the switch).

Smallest Net
When client is connected to network (and is configured to get an DHCP assigned address) it will broadcast doing a DHCP Discover of a DHCP server. This discover will contain several parameters that client want to have offered to them, IP address is obvious but others such as default gateway, DNS servers etc..

DHCP server will answer with a broadcast, DHCP Offer containing IP address and possibly other parameters.

If there are multiple DHCP servers answering the Discover client will pick one of them but usually the first Offer that it receives.

Client will then answer back with a broadcast DHCP Request to notify the second DHCP server that it will not take his offer but rather the first DHCP servers Offer, info about which offer to use is in the DHCP Requst packet even though its a broadcast.

The second DHCP server will see this DHCP request and see its not for him so he simply set the offered IP address as free in its DHCP database.

The first DHCP server will see the DHCP Request and write the offer into its DHCP database as assigned to client and also respond back  to client with DHCP Ack.

A simple thing to memorize the process is to remember DORA, Discovery, Offer, Request, Ack.

Packets towards DHCP server is from UDP port 68 to port 67 and packets from server to client is the reverse, UDP from port 67 to port 68.

DHCP-1


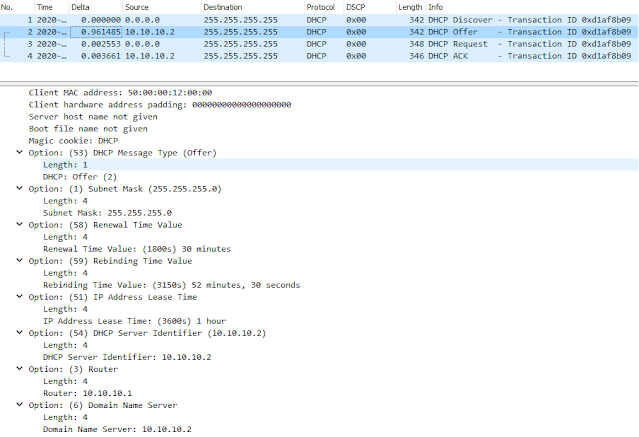
Here we see wireshark trace of the DHCP communication.
We see the Discover, Offer, Request and finally the ACK.
In the DHCP packets we can see all kinds of information, "Client Identifier (61)" is most of often the MAC address of clients interface configured with DHCP address, "Option (50)" is an option for clients to request a specific IP address, most likely what they had previously, "Option (55)" contains all kinds of additional parameters that client want the DHCP server to tell it to use.

DHCP options


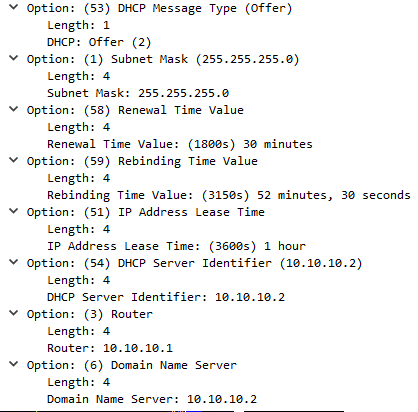
In the Offer back to client we see the IP address, subnet mask, default gateway (Router), DNS server and some timer options.
Lease time is how long client can use this address, this example is one hour which in real life is very short, its often set to days.
Renewal time is set by this DHCP server (a windows server 2019) to half of the lease time. This tells the client when half of the lease time has passed they can try to renew the lease. When this happens client will send a unicast DHCP Request directly to DHCP server asking if they can still use the same IP address. DHCP server will answer back with a unicast DHCP Ack together with all the other parameters should use. By just changing DHCP options on the server , clients will eventually get them and change settings on client side. If DHCP Request fails clients will have a slightly different behavior depending on implementation but it's common for clients to still send the unicast DHCP Request at a more frequent time until the Rebinding time kicks in and then change to broadcast.
Rebinding time is default set to 7/8 of the lease time.

What about when there is no DHCP server on the same segment that client is connected to?
DHCP client is broadcasting and therefore the DHCP discover packets cannot reach the DHCP server, so we need help somehow. 
The help is in form of a DHCP relay function on the router or in this case a Layer3 switch with routing functionality. The DHCP relay function will see the DHCP Discover packet and it will translate the broadcast to a unicast and send it to the configured address (10.10.10.2) with source of the interface facing clients (10.10.101.1). This is often called IP-Helper and is configured on the interface towards clients.
DHCP server will see the Discover and if there is a DHCP scope for the 10.10.101.0/24 network it will reply back to 10.10.101.1 with an Offer.

Cisco IOS command is 
Switch(config-if)#ip helper-address 10.10.10.2


In this wireshark capture created on the DHCP server segment we can see that there is no broadcast but only unicast between DHCP server and the DHCP relay agent IP address. Other than this the traffic is the same as when DHCP server and client are located on the same segment.
When the Renewal time comes up client will send a unicast directly to the DHCP server in the say it did before asking for new options and IP address.

The DHCP RFC 2131 for all the details.

Next post I will do a larger topology and add in some other options into the mix.

Friday, November 6, 2020

New focus

It has been long time since I wrote anything on this blog. Short reason is that I have not had time (or taken the time) to do so.

For the people that know me I have switched focus to my second baby “networking” which now is my main focus.

The switchover has been a lot of hard work but in the process I also managed to get the CCIE certification in Route & Switch , now renamed to Enterprise Infrastructure Cisco Certified Internetwork Expert

I have some topics that I will write about in the future so stayed tuned for some articles on mostly Cisco networking stuff.


Tuesday, August 4, 2015

Exchange Web Access changes name again

Every since Exchange 5.0 introduced access to mailboxes via a webgui, its name has changed several times.
Latest namechange is from Outlook Web App to Outlook on the web.
New features in Outlook on the web
Why the name change ? Your guess is equally good as mine, but I like that I don’t need to educate users about a new URL. It’s still https://..../owa

Thursday, July 23, 2015

Exchange server 2016 preview

Today Microsoft released a preview of Exchange server 2016. Read all about it at the Exchange team blog site http://blogs.technet.com/b/exchange/archive/2015/07/22/announcing-exchange-server-2016-preview.aspx

Documentation is also available here

Tuesday, March 17, 2015

Exchange patches

New Exchange patches was release today.

Exchange Server 2013 Cumulative Update 8 (build 15.00.1076.009) info is here KB3030080. Download here

Exchange Server 2010 Service Pack 3 Update Rollup 9 info (build 14.03.0235.001) is in KB3030085. Download here

Exchange Server 2007 Service Pack 3 Update Rollup 16 (build 8.3.406.0) info is in KB3030086. Download here

As always, read the release notes and test before deploying.

Tuesday, December 9, 2014

New Exchange patches

UPDATE:
the Exchange 2010 Rollup8 has a bug in it so Microsoft removed the download link and will replace this rollup. If you happen to be fast and already installed KB2986475, Microsoft recomend to uninstall it and wait for the updatged rollup.Exchange Server 2013 Cumulative Update 7 (CU7) is released.
A version 2 of Exchange 2010 SP3 UR8 is now released, download here.
 
Exchange 2013 Cumulative Update 7.
Download link and KB2986485
Exchange Server 2010 Service Pack 3, Update Rollup 8.
Download link and KB2986475
Exchange Server 2007 Service Pack 3, Update Rollup 15.
Download link and KB2996150
Notice that there is Active directory schema updates that must be applied before installing Exchange 2013 CU7.

Sunday, November 30, 2014

Exchange cmdlet Extension Agents

Cmdlet extension agents are components within Exchange 2013 that are invoked when Exchange cmdlet’s run. Agens can do additional action when Exchange cmdlet are run such as modify,add functionality or validate input parameters.

Several agents exists out of the box when installing Exchange 2013. Run Get-CmdletExtensionAgent to see. note that they can be disabled/enabled and have a priority.

image

The one agent we can manipulate with ease is the “Scripting Agent”. It runs Exchange cmdlets located in an XML file, $exbin\CmdletExtensionAgents\ScriptingAgentConfig.xml. This file does not exists by default but there is a sample file in the same directory which contains examples.

The most common scenario I would think of is to run some cmdlet after a cmdlet is run. for example. when you create a mailbox you can also run some cmdlet to set some additional parameters on the mailbox. My example here is to enable SingleItemRecovery and also change de default permission on calendar to LimitedDetails for everyone to see the subject of calendar objects.

   1: <?xml version="1.0" encoding="utf-8" ?>


   2: <Configuration version="1.0">


   3:     <Feature Name="MailboxProvisioning" Cmdlets="Enable-Mailbox">


   4:         <ApiCall Name="OnComplete">


   5:             if($succeeded) {


   6:                 $ErrorActionPreference = "SilentlyContinue"


   7:                 $MaxTime = 60


   8:                  for ($LoopVar = 0;$LoopVar -lt $MaxTime;$LoopVar++) {


   9:                     if($provisioningHandler.UserSpecifiedParameters["Identity"] -ne $null) {


  10:                     $user = Get-user $provisioningHandler.UserSpecifiedParameters["Identity"] 


  11:                     $mbx = Get-Mailbox $user.DistinguishedName


  12:                     If (-not($mbx)) {


  13:                         Start-Sleep 1


  14:                         continue # with the for loop


  15:                     } 


  16:                     else


  17:                     {


  18:                         # Enable SingleItemRecovery


  19:                         Set-Mailbox $mbx -SingleItemRecoveryEnabled $true


  20:                         WriteToLog (' enabled singleitemrecovery on ' + [string]$mbx.alias)


  21:                         # set sharing permissoin on calendar folder


  22:                         $CalendarName = (Get-MailboxFolderStatistics -Identity $mbx.alias -FolderScope Calendar | Select-Object -First 1).Name


  23:                         $folderID = $MBX.alias + ':\' + $CalendarName


  24:                         Set-MailboxFolderPermission -Identity $folderID -User 'Default' -AccessRights 'LimitedDetails'


  25:                         WriteToLog (' set sharing permission on calenderfolder on ' + [string]$mbx.alias)


  26:                         break # out of for loop


  27:                     }


  28:                     }


  29:                 }


  30:                 $ErrorActionPreference = "Continue"


  31:             }


  32:         </ApiCall>


  33:     </Feature>


  34:     <Feature Name="MailboxProvisioning" Cmdlets="New-Mailbox">


  35:         <ApiCall Name="OnComplete">


  36:             if($succeeded) {


  37:                 $ErrorActionPreference = "SilentlyContinue"


  38:                 $MaxTime = 60


  39:                  for ($LoopVar = 0;$LoopVar -lt $MaxTime;$LoopVar++) {


  40:                     if($provisioningHandler.UserSpecifiedParameters["Name"] -ne $null) {


  41:                     $user = Get-user $provisioningHandler.UserSpecifiedParameters["Name"] 


  42:                     $mbx = Get-Mailbox $user.DistinguishedName


  43:                     If (-not($mbx)) {


  44:                         Start-Sleep 1


  45:                         continue # with the for loop


  46:                     } 


  47:                     else


  48:                     {


  49:                         # Enable SingleItemRecovery


  50:                         Set-Mailbox $mbx -SingleItemRecoveryEnabled $true


  51:                         WriteToLog (' enabled singleitemrecovery on ' + [string]$mbx.alias)


  52:                         # set sharing permissoin on calendar folder


  53:                         $CalendarName = (Get-MailboxFolderStatistics -Identity $mbx.alias -FolderScope Calendar | Select-Object -First 1).Name


  54:                         $folderID = $MBX.alias + ':\' + $CalendarName


  55:                         Set-MailboxFolderPermission -Identity $folderID -User 'Default' -AccessRights 'LimitedDetails'


  56:                         WriteToLog (' set sharing permission on calenderfolder on ' + [string]$mbx.alias)


  57:                         break # out of for loop


  58:                     }


  59:                     }


  60:                 }


  61:                 $ErrorActionPreference = "Continue"


  62:             }


  63:         </ApiCall>


  64:     </Feature>


  65:  


  66:     <Common>


  67:         <!-- common functions -->


  68:  


  69:         function WriteToLog {param ([string]$text)


  70:             $t = Get-Date -Format yyyyMM


  71:             $LogFile = 'C:\temp\scriptingAgent_' + $t + '.log'


  72:  


  73:             # $text = text to be written to logfile


  74:             $t = Get-Date -Format yyyyMMdd:HHmmss


  75:             $text = '[' + $t + '] ' + $text


  76:             $text >> $LogFile


  77:         } #end function LogToFile


  78:     </Common>


  79:  


  80: </Configuration>


the XML elements to notice here is Feature, ApiCall and Common. Feature hold the Cmdlet attribute , here you put in the Exchange cmdlet you want to do something with. ApiCall you enter what you want to do, I use OnComplete which will trigger after the cmdlet in feature element.

Both Feature and ApiCall can be in the XML file multiple times.


You can see in my example here (line 3 and 4) that the *Scripting Agent” will run a script block after Enable-mailbox is completed. I start by doing a trick to allow the Active Directory replication have a chance to finish before we actually do something. line 19 to 25 is where the stuff I actually want to happen after Enable-Mailbox.


Line 34,35 is when you run New-Mailbox. I could have have the New-Mailbox and Enable-Mailbox together but separated them because in they use different anchor to the mailbox (line 10 and 41).  
The common section in the XML file contains a small powershell function to write some information to a text file.


Other things I hear customer do is to apply some policies to mailboxes and disable things such as pop/imap.

So now that you have a XML file to work with you can simply add your own logic when some Exchange cmdlet is run and not only to when provisioning mailboxes, it could be for DL’s or whatever your imagination can come up with.


Of course you must enable “Scripting Agent” with

Enable-CmdletExtensionAgent “Scripting Agent” and also copy your XML file to every Exchange server in your environment.

Thursday, August 21, 2014

Exchange Health Manager bug

You hopefully know that Exchange Health Manager monitor the Exchange server by sending Probes. The result is picked up by Monitors which decide if a Responder needs to do something about the problem.

The other day I found that a HealthSet on the server was UnHealthy. This was found by running this commands.

Get-HealthReport -Server ex1 | where {$_.AlertValue -eq 'UnHealthy'} | ft –AutoSize

Result showed that “OutlookMapiHttp” HealthSet was to blame.
You can trigger a probe to execute at any time, first we need to know what the probe name is.

Get-MonitoringItemIdentity -Server ex1 -Identity OutlookMapiHttp | ft Identity, ItemType, Name

Result show the probe name for the OutlookMapiHttp HealthSet, “OutlookMapiHttpCtpProbe”.

Since we are dealing with outlook connectivity problem here we should use the Test-OutlookConnectivity cmdlet to trigger the probe to run.

Test-OutlookConnectivity -RunFromServerId ex1 -ProbeIdentity OutlookMapiHttpCtpProbe

Another way of trigger the probe would be
Invoke-MonitoringProbe -Server ex1 -Identity OutlookMapiHttp\OutlookMapiHttpCtpProbe

Both cmdlets took a about 90 seconds before they come back with a result saying “Failed to find proberesult”
Could this be a performance issue? This server showed no peformance related problem, it is actually a oversized box.
I fired up event viewer and looked in different eventlogs under Microsoft\Exchange\ManagedAvailability and Microsoft\Exchange\ActiveMonitoring. Events here show probe definitions and firing, monitors reading probe results and what responders do and the result of responders as well. The best way of reading this info is to switch from General to Details and filter on Errors.

I could find snippet of text “The remote server returned an error (404). Not Found and a reference to a Health Mailbox.
This was strange. monitoring mailboxes is created on demand when the Health Manager service do its thing, so I trigger a restart of it but no difference. waited several hours and did a reboot but no difference even when waiting until the next day.
Discussed this with en engineer at Microsoft and he eventually suggested to change the time zone on the server from the current GMT+1 to a time zone used in America. Did that and nothing happened. In desperation I rebooted the server again and bang, now the “OutlookMapiHttp” healthset showed Healthy.
I played around with time zone and restart of Exchange Health Management service and could make the problem come and go as I changed time zone.

I haven’t tried all time zones but it looks like if you’re using GMT+something this bug will surface.
f you don’t want to change time zone on server you can create on monitoring overide.

Add-ServerMonitoringOverride -Identity OutlookMapiHttp\OutlookMapiHttpCtpMonitor -ItemType monitor -PropertyName Enabled -PropertyValue 0 -Server ex1 -ApplyVersion 15.0.913.22

In a few minutes you would see your healthset go healthy. together with the OutlookMapiHttp healthset there is also another healthset that also shows unhealthy “OutlookMapiHttp.Proxy” and is subjct to same bug with time zone. to make an override for it use.

Add-ServerMonitoringOverride -Identity OutlookMapiHttp.Proxy\OutlookMapiHttpProxyTestMonitor\MSExchangeMapiFrontEndAppPool -ItemType monitor -PropertyName Enabled -PropertyValue 0 -Server ex1 -ApplyVersion 15.0.913.22

We can only hope that this is fixed in the next CU of Exchange 2013.

Thursday, August 14, 2014

Outlook update

Microsoft published an update for outlook 2013 on August 12. It was suppose to fix several things.
Sadly it also introduced a bug where you could not get access to Exchange archive in some circumstances.
Well so it happens that Microsoft has now reacted and pulled the update for further investigation. If you have already installed this patch and encounter problem you could easily uninstall it.

Read KB2881011 for more info.

So another update that introduces problem. It feels like Microsoft don’t test updates that much anymore My guess is that the “Cloud/Mobile first” mantra Microsoft advertise makes the internal processes at Microsoft spin a little to fast and then quality is sacrificed. This is something we have seen the last year and I can only hope it gets better.

Monday, July 28, 2014

Using Windows 8.1 mail app without a Microsoft account

Running Windows 8.1 you have a choice of either using Microsoft account/local account or an Active Directory account if the computer is joined to an Active Directory domain.
Having the computer joined to an AD domain is the common scenario in the corporate world and you then most of the time use the Active Directory account to logon to the computer. To do email and calendaring there is big chance you’re using Outlook but what if you want to run the built in mail app in windows 8?  When starting mail app you’re then prompted to change the computer settings to logon/sign-in with a Microsoft account.
image
This will of course not go very well when computer is joined to an AD domain so what to do?
When using a domain joined account you might see this wizard instead if the Switch to a Microsoft account.
image

Happy you enter your corporate email account and password but the wizard comes back with bad password and prompt you to enter the information correctly. It seems that it only works for hotmail/LiveID/Microsoft accounts and not for a regular Exchange account. So what to do?

I found a group policy setting “Administrative Templates\Windows Components\App Runtime\Allow Microsoft account to be optional”.
If you enable this policy , mail app won’t prompt you to change computer settings to use Microsoft account but instead simply prompt for corporate account and password for the email account you want to use. This policy can be set either on user or computer and as a local policy. Description for the policy implies that other windows store app might behave similar as mail app do and allow user to enter the corporate creds instead of the Microsoft account.
Mail app uses the computer policy to configure this setting.

Time to edit a group policy perhaps ?

Monday, June 30, 2014

Who and what is using the Exchange Web Service

Exchange Web Service (EWS) has been around since Exchange 2007. You  should know that outlook uses EWS for several functions and primary for calendar stuff such as Free/Busy queries. There is also several flavor of Mac that uses EWS as its only API for communicating with Exchange.
Toss in Lync client in the mix and you will also see it communicating with EWS.
To get a complete list of what us using your Exchange servers EWS you have to look in the IIS-logs. Your buddy here is the good old logpaser which can be found here LogParser 2.2 download.
Copy the IIS logfiles you want to analyze into a folder of your choice. Start a command prompt and run:
"C:\Program Files (x86)\Log Parser 2.2\LogParser.exe" "SELECT cs(User-Agent) as UserAgent, count(*) as hits FROM "path to iis logfiles" WHERE cs-uri-stem LIKE '/EWS/Exchange.asmx' AND cs-username GROUP BY UserAgent" –I:IISW3C
Output will show the UserAgent and number of corresponding hits.
You can add “-O:tsv > outputfilename.txt” at the end of the logparser query to save the output in a tab separated text file for easier reading.
You can also run the logparser query in LogParserStudio. You see here that there is a number of different clients using EWs and they also have different patch levels. UserAgent OC/15 is Lync 2013 client and OC/4 is Lync 2010 client.
ExchangeServicesClient is an appl. made by EWS managed API.
image
You might also find other UserAgents in there such as “Sipe/1.18.2” or “Evolution/3.10.2”.
You might want to stop them from accessing EWS, how is this done?
If you have configured your LoadBalancer to do Layer 7 inspection you probably could stop these UserAgents but a much easier way is to do this.
Configure some properties on the Organization object.
First have a look of current and default configuration. We see here that by default everyone is allowed to communicate with EWS
Get-OrganizationConfig | fl EWS*
EwsAllowEntourage          :
EwsAllowList               :
EwsAllowMacOutlook         :
EwsAllowOutlook            :
EwsApplicationAccessPolicy :
EwsBlockList               :
EwsEnabled                 :

How do you stop certain clients or only allow some?
Set the EwsApplicationAccessPolicy parameter to either EnforceAllowList or EnforceBlockList and then us the EwsBlockList or EwsAllowList which is an array of UserAgent (case sensitive) of the applications. You must also set the Enable EwsEnabled parameter to true to get this to work.
So there is actually a way to allow only certain applications to communicate with EWS. have a look at the Set-OrganizationConfig cmdlet http://technet.microsoft.com/en-us/library/aa997443(v=exchg.150).aspx

Saturday, May 31, 2014

Why is my Exchange server unhealthy

Your Exchange 2013 server was just installed and you thought everything should look nice and shiny. But after you install SCOM management pack and start to collect information from Exchange servers you notice that many things is flagged as unhealthy.

You try the Exchange management cmdlet “Get-HealthReport <servername> and see some components show up as unhealthy. Not surprisingly it is the same things SCOM flags as unhealthy. SCOM management pack is totally different for Exchange 2013 than previous versions of Exchange. Previous version SCOM did a lot of testing to verify that Exchange was healthy. Now Exchange do this natively with Manages Exchange server health service, a.k.a. Managed Availability and SCOM is just reading the eventlog. Well it does more than just reading the eventlog but that’s not the scope for this article neither is the Managed Availability stuff except that it has Probes, Monitors and Responders.

Common things to show unhealthy are:
FEP: Forefront Endpoint Protection. Reason for this is that FEP is not installed on your server. You can of course install FEP on the server. if you do, carefully exclude processes/folders otherwise FEP will interfere with Exchange and possibly destroy functionality. Anti-Virus Software in the Operating System on Exchange Servers.
If you don’t want to install FEP you can make the unhealthy status go away in two ways. Edit the FEPActiveMonitoringContext.xml file and set the Enabled parameter to False. File is located in Exchange installation directory\bin\monitoring\config. You can also configure a MonitoringOverride with Add-ServerMonitoringOverride cmdlet. You can either create an override that’s last for up to 60 days or by version. Here is the command for creating an override by version.
Add-GlobalMonitoringOverride -Item Monitor -Identity "FEP\MaintenanceFailureMonitor.FEP" –PropertyName Enabled -PropertyValue 0 –ApplyVersion 15.0.847.32

Version can be found by running
Get-ExchangeServer e15-ex3 | fl AdminDisplayVersion
Versoin 15.0.847.32 happens to be Exchange 2013 SP1.

Identity is found with
Get-MonitoringItemIdentity -Identity FEP –Server <servername> | ft Identity,ItemType,TargetResource
it will produce a list of stuff related to FEP and it’s the monitor you would like to an override on, hence the Identity “FEP\MaintenanceFailureMonitor.FEP” in the overridemonitoring command.

When you have created the override monitor for FEP you should see the unhealthy status go away after a few minutes.

CASProxy’s
One of the most common reason for CASproxies to show up as unhealthy is that you’re using Basic auth only on the virtual directories. Reason for this is often that you’re using a reverseproxy that do authentication and authenticate to Exchange with basic auth.
configure your virtual directories to allow windows integrated or FBA. Seems like the probe only cannot use Basic authentication. Note.  This seems to be fixed in the just released CU5 for Exchange 2013.
You could also create a GlobalMonitoringOverride as you did for FEP.

There is of course several other things that could end up being flagged as unhealthy but use the Eventlog and look into the crimson channel logs and Get-MonitoringItemIdentity  to get more information whats wrong. Perhaps there is a real problem or just something that you need to do correct with an override

I recommend doing override with the version parameter because you don’t know what happens in the next Cumulative Update for Exchange. In the case with CASproxy’s it seems that Microsoft has correct the probe to also use Basic Authentication.
Remember though that when applying upcomgin CU you probably need to create new monitoringoverrides that match the new version.

Monday, April 14, 2014

Protect your SMTP domain with SPF records

If you  haven’t created a SPF record to protect your SMPT domain on Internet this is for you.

SPF is not a single thing , it is two things. One thing is to verify incoming mail to your servers that they originate from a list of trusted servers. an example would be when your serves receive a mail that claims to be from domain.com , your server will do a lookup in DNS for information (the SPF record). This info will (if existing) have list of servers that are authorized to send mail with sender with SMTP address in domain.com domain. next step is for the receiving server to verify this SPF info together with header info in mail message and IP address of the sending server, if everything is OK it server will simply accept the email but if there is mismatch you have to decide and configure your server what to do, perhaps let email through anyway or mark it as spam.

The other thing is to create your own SPF record for others to verify mail claiming to come from your SMTP address space.

Easiest way to create your SPF record is to use one of the multiple wizards on Internet. Microsoft also has one https://www.microsoft.com/mscorp/safety/content/technologies/senderid/wizard/ which is quite good. Remember that no wizard will never provide you with good results unless you enter good information into it so next step is to find all servers that send SMTP mail with senders from the SMTP domain you want to edit the SPF record for, this is key for a proper working SPF deployment.
SPF record itself is a plain TXT record in the zone authoritative for the SMTP domain and you can enter information in a variety of ways, IP addresses, server name, MX or a combination of them.

some examples of SPF records in domain.com zone.
v=spf1 ip4:10.10.10.10 ~all
This means that only a server with IP 10.10.10.10 is allowed to send mail with senders addresses in domain.com zone.

v=spf1 mx ~all
only servers listed in the MX record are allowed

v=spf1 a mx ip4:10.10.10.10 ~all
Only servers with A records or MX records or IP equal to 10.10.10.10 is allowed

The all parameter:
all parameter in SPF is prefixed with different chars such as – ~ ? +
- means that the information must match, it is otherwise illegal.
~ means that it should match but could also mismatch.
+ means that it is absolutely fine for other servers than listed to send email for domain.com
? means either way, it may or may not originate from the servers specified.

Outsourced domain
Sometimes you need to let someone else deliver mail for your domain such as news mail sent from a provider or perhaps you have configured your Exchange in a hybrid setup with some users on on premise and some in Office 365. you can of course simply add the providers IP addresses to your SPF record but this impractical because could change without you knowing and they could also be multiple causing the SPF syntax to be invalid.

Why would SPF be invalid when you have a lot of information in it?
the RFC states that the receiving server must be able to figure out each SPF record with 10 or less NS queries.
solution for outsourced email or many NS queries is to use the include parameter.

v=spf1 mx include:provider.net ~all
this means either mail are authorized to come from servers listed as MX or whatever the spf record says in the provider.net zone. With this technique you can manage your servers and the provider can manage their environment independent and also making the verifying server only do 2 NS queries. first for your MX records and the other one for the SPF record in provider.net zone, now there is a new spf record giving us 10 additional queries to use.

Good practice in my opinion.
Collect information about all system that could send mail for domain.com.
Start with ?all parameter and try to log what’s happening. by logging I mean log what NS queries is done against the domain.com zone. this is a lot easier if you run and manage the NS hosting the domain.com zone than if it outsourced to a provider which might not be that helpful with statistics.
Don’t change to –all unless you are very sure that the spf record is correct.
Don’t use your production domain for bulk marketing mail, create a separate domain for this because if something goes wrong, only the marketing stuff will fail.
Verify your SPF syntax, here is on tool that can be used http://www.kitterman.com/spf/validate.html
If you have a lot of info in your SPF, use the include parameter.
Verify incoming email to your environment

make Exchange verify incoming email.
Install the ant spam agents which is already deployed if you’re using Edge. configure the SenderID transport agent.
Configure it with appropriate action.
Set-SenderIdConfig -SpoofedDomainAction StampStatus

spoofedDomainAction could be Delete, Reject of StampStatus. StampStatus is interesting since it will allow mail to be received but Exchange will stamp it and later in the transport pipeline the content filtering agent will consider this stamping and most likely classify the email as more likely to be spam.

Last, enable the SenderID agent with Set-SenderIdConfig -Enabled $true

The senderID agent has some other good to know configuration parameters. BypassedRecipients and BypassedSenderDomains which is self explainatory, there is also TempErrorAction which also has the Delete,Reject, StampStatus values.
TempErrorAction happens when the  verifying server encountered a transient error while checking the SPF, perhaps the spf syntax is incorrect, perhaps NS query timed out or something else that wasn’t considered to be normal.

Be safe and publish spf info in your DNS about your smtp domains and enable checking of the spf for incoming mail to your servers.